轻量级 Kubernetes 发行版实践

目录
部署和管理原生 Kubernetes 集群是一项复杂的任务,为了解决这个问题,社区提供了轻量级 Kubernetes 发行版作为解决方案。
Minikube 结合 Podman 实践
Minikube 是一种轻量级的 Kubernetes 实现,可在本地计算机上创建虚拟机并部署仅包含一个节点的简单集群。
Podman 是一个开源的容器运行时工具,它提供与 Docker 相似的功能,但不需要守护进程,并且支持更多的安全特性和 rootless 模式运行。
基础环境
OS: macOS
Architecture: ARM64
Driver: Podman

CPUs: 2
Memory: 2Gi
Disk: 20GiB

Installer: Homebrew
安装使用 Podman
➜ brew install podman
==> Installing dependencies for podman: capstone, dtc, pcre2, gettext, glib, gmp, libtasn1, nettle, p11-kit, openssl@3, libnghttp2, unbound, gnutls, jpeg-turbo, libpng, libslirp, libssh, libusb, lzo, pixman, snappy, vde and qemu
==> podman
➜ podman machine init --cpus 2 --memory 2048 --disk-size 20 --rootful
Downloading VM image: fedora-coreos-39.20231204.2.1-qemu.aarch64.qcow2.xz: done
Extracting compressed file: podman-machine-default_fedora-coreos-39.20231204.2.1-qemu.aarch64.qcow2: done
Image resized.
Machine init complete
➜ podman machine start
Starting machine "podman-machine-default"
Waiting for VM ...
Mounting volume... /Users:/Users
Mounting volume... /private:/private
Mounting volume... /var/folders:/var/folders
API forwarding listening on: /Users/damonguo/.local/share/containers/podman/machine/qemu/podman.sock

The system helper service is not installed; the default Docker API socket address can't be used by podman.
If you would like to install it, run the following commands:
  sudo /opt/homebrew/Cellar/podman/4.8.1/bin/podman-mac-helper install
  podman machine stop; podman machine start

  You can still connect Docker API clients by setting DOCKER_HOST using the following command in your terminal session:
  export DOCKER_HOST='unix:///Users/damonguo/.local/share/containers/podman/machine/qemu/podman.sock'

Machine "podman-machine-default" started successfully
➜ podman machine list
NAME                    VM TYPE     CREATED        LAST UP            CPUS        MEMORY      DISK SIZE
podman-machine-default  qemu        8 minutes ago  Currently running  2           2GiB        20GiB
安装使用 Minikube
➜ brew install minikube
==> Installing dependencies for minikube: kubernetes-cli
==> minikube
➜ minikube config set driver podman
These changes will take effect upon a minikube delete and then a minikube start
➜ minikube start --driver=podman --kubernetes-version=v1.28.3
minikube v1.32.0 on Darwin 14.1.2 (arm64)
Using the podman (experimental) driver based on user configuration

Using Podman driver with root privileges
Starting control plane node minikube in cluster minikube
Pulling base image ...
Downloading Kubernetes v1.28.3 preload ...
preloaded-images-k8s-v18-v1...:  341.16 MiB / 341.16 MiB  100.00% 13.99 M
gcr.io/k8s-minikube/kicbase...:  410.58 MiB / 410.58 MiB  100.00% 13.22 M

Creating podman container (CPUs=2, Memory=1887MB) ...
Preparing Kubernetes v1.28.3 on Docker 24.0.7 ...
Generating certificates and keys ...
Booting up control plane ...
Configuring RBAC rules ...
Configuring bridge CNI (Container Networking Interface) ...

Verifying Kubernetes components...
Using image gcr.io/k8s-minikube/storage-provisioner:v5

Enabled addons: storage-provisioner, default-storageclass
Done! kubectl is now configured to use "minikube" cluster and "default" namespace by default
➜ minikube status
minikube
type: Control Plane
host: Running
kubelet: Running
apiserver: Running
kubeconfig: Configured
➜ kubectl get namespaces
NAME              STATUS   AGE
default           Active   4m40s
kube-node-lease   Active   4m40s
kube-public       Active   4m40s
kube-system       Active   4m40s

➜ kubectl get nodes
NAME       STATUS   ROLES           AGE     VERSION
minikube   Ready    control-plane   4m44s   v1.28.3

➜ kubectl get svc
NAME         TYPE        CLUSTER-IP   EXTERNAL-IP   PORT(S)   AGE
kubernetes   ClusterIP   10.96.0.1    <none>        443/TCP   16m
部署测试 Nginx Service
➜ vim nginx-deploy-svc.yaml
---
apiVersion: apps/v1
kind: Deployment
metadata:
  name: nginx-deploy
spec:
  replicas: 2
  selector:
    matchLabels:
      app: nginx
  template:
    metadata:
      labels:
        app: nginx
    spec:
      containers:
        - name: nginx
          image: nginx
          ports:
            - containerPort: 80
---
apiVersion: v1
kind: Service
metadata:
  name: nginx-svc
spec:
  selector:
    app: nginx
  ports:
    - name: http
      port: 80
  type: NodePort
➜ kubectl apply -f nginx-deploy-svc.yaml
deployment.apps/nginx-deploy created
service/nginx-svc created
➜ kubectl get all
NAME                                READY   STATUS    RESTARTS   AGE
pod/nginx-deploy-7c5ddbdf54-4d8c2   1/1     Running   0          67s
pod/nginx-deploy-7c5ddbdf54-cmcg2   1/1     Running   0          67s

NAME                 TYPE        CLUSTER-IP      EXTERNAL-IP   PORT(S)        AGE
service/kubernetes   ClusterIP   10.96.0.1       <none>        443/TCP        24m
service/nginx-svc    NodePort    10.103.72.229   <none>        80:31985/TCP   67s

NAME                           READY   UP-TO-DATE   AVAILABLE   AGE
deployment.apps/nginx-deploy   2/2     2            2           67s

NAME                                      DESIRED   CURRENT   READY   AGE
replicaset.apps/nginx-deploy-7c5ddbdf54   2         2         2       67s
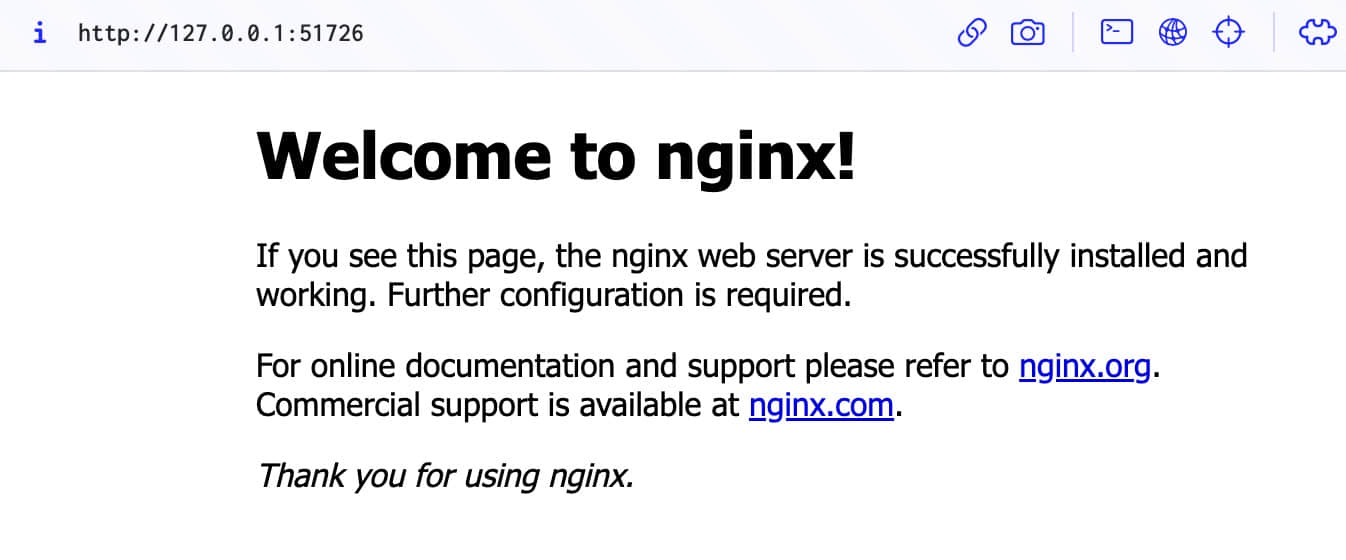
➜ minikube service nginx-svc --url
http://127.0.0.1:51726
Because you are using a Docker driver on darwin, the terminal needs to be open to run it.
清理 Minikube 和 Podman
➜ minikube stop
Stopping node "minikube"  ...
Powering off "minikube" via SSH ...
1 node stopped.
➜ minikube status
minikube
type: Control Plane
host: Stopped
kubelet: Stopped
apiserver: Stopped
kubeconfig: Stopped
➜ minikube delete
Deleting "minikube" in podman ...
Deleting container "minikube" ...
Removing /Users/damonguo/.minikube/machines/minikube ...
Removed all traces of the "minikube" cluster.
➜ podman machine list
NAME                    VM TYPE     CREATED         LAST UP            CPUS        MEMORY      DISK SIZE
podman-machine-default  qemu        54 minutes ago  Currently running  2           2GiB        20GiB
➜ podman machine stop podman-machine-default
Waiting for VM to exit...
Machine "podman-machine-default" stopped successfully
➜ podman machine rm podman-machine-default
The following files will be deleted:

/Users/damonguo/.ssh/podman-machine-default
/Users/damonguo/.ssh/podman-machine-default.pub
/Users/damonguo/.config/containers/podman/machine/qemu/podman-machine-default.ign
/Users/damonguo/.local/share/containers/podman/machine/qemu/podman-machine-default_fedora-coreos-39.20231204.2.1-qemu.aarch64.qcow2
/Users/damonguo/.local/share/containers/podman/machine/qemu/podman.sock
/Users/damonguo/.local/share/containers/podman/machine/qemu/podman-machine-default_ovmf_vars.fd
/Users/damonguo/.config/containers/podman/machine/qemu/podman-machine-default.json

Are you sure you want to continue? [y/N] y
➜ minikube delete --purge --all
Successfully deleted all profiles
Successfully purged minikube directory located at - [/Users/damonguo/.minikube]

➜ brew uninstall minikube
Uninstalling /opt/homebrew/Cellar/minikube/1.32.0... (9 files, 87.5MB)
KinD 实践
KinD 是一个工具,用于在 Docker 中运行本地 Kubernetes 集群。
基础环境
OS: macOS
Architecture: ARM64
Driver: Docker

Installer: Homebrew
安装使用 KinD
➜ brew install kind
==> Installing kind
==> Pouring kind--0.20.0.arm64_sonoma.bottle.tar.gz
==> kind
➜ kind version
kind v0.20.0 go1.21.1 darwin/arm64
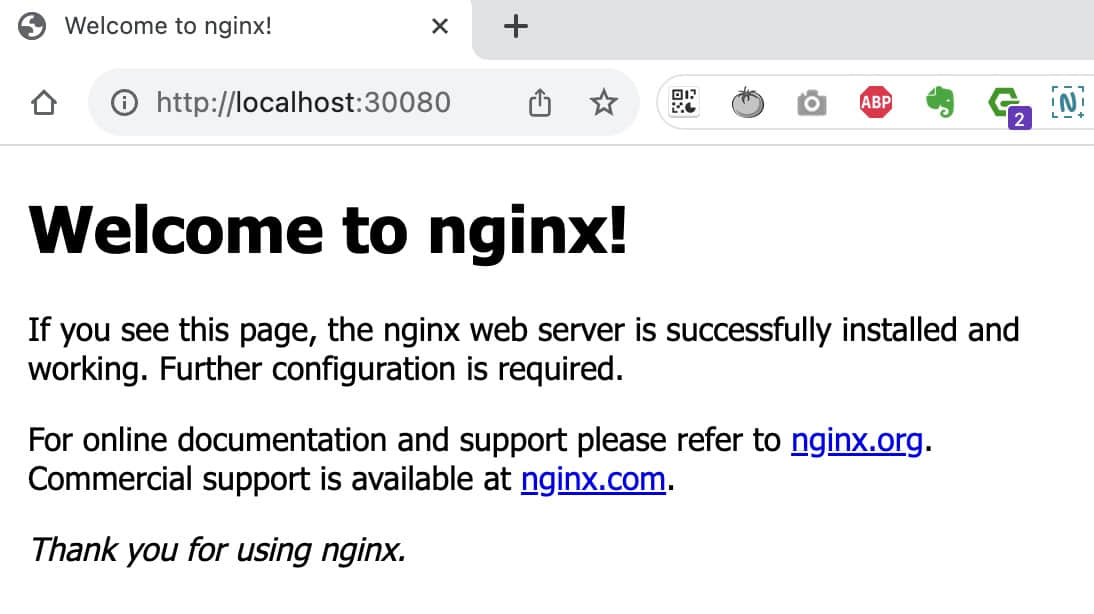
创建一个名为 mycluster 的 K8S 集群,并将 hostPort 的30080端口暴露到 localhost 的30080端口。
➜ vim config-with-port-mapping.yaml
kind: Cluster
apiVersion: kind.x-k8s.io/v1alpha4
nodes:
- role: control-plane
  extraPortMappings:
  - containerPort: 30080
    hostPort: 30080
➜ kind create cluster --name mycluster --config=config-with-port-mapping.yaml
Creating cluster "mycluster" ...
 ✓ Ensuring node image (kindest/node:v1.27.3)
 ✓ Preparing nodes
 ✓ Writing configuration
 ✓ Starting control-plane
 ✓ Installing CNI
 ✓ Installing StorageClass
Set kubectl context to "kind-mycluster"

You can now use your cluster with:
kubectl cluster-info --context kind-mycluster

Thanks for using kind!
➜ kubectl cluster-info --context kind-mycluster
Kubernetes control plane is running at https://127.0.0.1:64070
CoreDNS is running at https://127.0.0.1:64070/api/v1/namespaces/kube-system/services/kube-dns:dns/proxy
➜ kind get clusters
mycluster
➜ kubectl get nodes
NAME                      STATUS   ROLES           AGE   VERSION
mycluster-control-plane   Ready    control-plane   85s   v1.27.3

➜ kubectl get pods -n kube-system
NAME                                              READY   STATUS    RESTARTS   AGE
coredns-5d78c9869d-6zdpz                          1/1     Running   0          81s
coredns-5d78c9869d-twr96                          1/1     Running   0          81s
etcd-mycluster-control-plane                      1/1     Running   0          94s
kindnet-x9zrb                                     1/1     Running   0          81s
kube-apiserver-mycluster-control-plane            1/1     Running   0          96s
kube-controller-manager-mycluster-control-plane   1/1     Running   0          94s
kube-proxy-5zzch                                  1/1     Running   0          81s
kube-scheduler-mycluster-control-plane            1/1     Running   0          94s

➜ kubectl get namespaces
NAME                 STATUS   AGE
default              Active   108s
kube-node-lease      Active   108s
kube-public          Active   108s
kube-system          Active   108s
local-path-storage   Active   104s
部署测试 Nginx Service
➜ kubectl get all
NAME                 TYPE        CLUSTER-IP   EXTERNAL-IP   PORT(S)   AGE
service/kubernetes   ClusterIP   10.96.0.1    <none>        443/TCP   119s
➜ vim nginx-deploy-svc-portmapping.yaml
---
apiVersion: apps/v1
kind: Deployment
metadata:
  name: nginx-deploy
spec:
  replicas: 2
  selector:
    matchLabels:
      app: nginx
  template:
    metadata:
      labels:
        app: nginx
    spec:
      containers:
        - name: nginx
          image: nginx
          ports:
            - containerPort: 80
---
apiVersion: v1
kind: Service
metadata:
  name: nginx-svc
spec:
  selector:
    app: nginx
  ports:
    - name: http
      port: 80
      nodePort: 30080
  type: NodePort
➜ kubectl apply -f nginx-deploy-svc-portmapping.yaml
deployment.apps/nginx-deploy created
service/nginx-svc created
➜ kubectl get all
NAME                               READY   STATUS    RESTARTS   AGE
pod/nginx-deploy-55f598f8d-f2c2q   1/1     Running   0          35s
pod/nginx-deploy-55f598f8d-ljxd8   1/1     Running   0          35s

NAME                 TYPE        CLUSTER-IP     EXTERNAL-IP   PORT(S)        AGE
service/kubernetes   ClusterIP   10.96.0.1      <none>        443/TCP        5m5s
service/nginx-svc    NodePort    10.96.221.64   <none>        80:30080/TCP   35s

NAME                           READY   UP-TO-DATE   AVAILABLE   AGE
deployment.apps/nginx-deploy   2/2     2            2           35s

NAME                                     DESIRED   CURRENT   READY   AGE
replicaset.apps/nginx-deploy-55f598f8d   2         2         2       35s
访问 Nginx: http://localhost:30080
清理 KinD
➜ kind delete cluster --name mycluster
Deleting cluster "mycluster" ...
Deleted nodes: ["mycluster-control-plane"]

➜ kind get clusters
No kind clusters found.
K3S 结合 Multipass 实践
K3S 是一个轻量级、易于安装的 Kubernetes 发行版。 Multipass 是一个用于快速创建、管理和操作 Ubuntu 虚拟机的工具。
基础环境
OS: macOS
Architecture: ARM64
Virtualization: Multipass

CPUs: 1
Memory: 1Gi
Disk: 10GiB

Installer: Homebrew
安装使用 Multipass
➜ brew install --cask multipass
==> Downloading https://github.com/canonical/multipass/releases/download/v1.12.2/multipass-1.12.2+mac-Darwin.pkg
==> Installing Cask multipass
installer: Package name is multipass
installer: Installing at base path /
installer: The install was successful.
multipass was successfully installed!
➜ multipass launch --name k3s --cpus 1 --memory 1G --disk 10G
Launched: k3s
➜ multipass info k3s
Name:           k3s
State:          Running
IPv4:           192.168.64.2
Release:        Ubuntu 22.04.3 LTS
Image hash:     9256911742f0 (Ubuntu 22.04 LTS)
CPU(s):         1
Load:           0.56 0.15 0.05
Disk usage:     1.4GiB out of 9.6GiB
Memory usage:   140.0MiB out of 962.3MiB
Mounts:         --
安装使用 K3S
➜ multipass shell k3s
Welcome to Ubuntu 22.04.3 LTS (GNU/Linux 5.15.0-89-generic aarch64)
ubuntu@k3s:~$ curl -sfL https://get.k3s.io | sh -
[INFO]  Finding release for channel stable
[INFO]  Using v1.27.7+k3s2 as release
[INFO]  Downloading hash https://github.com/k3s-io/k3s/releases/download/v1.27.7+k3s2/sha256sum-arm64.txt
[INFO]  Downloading binary https://github.com/k3s-io/k3s/releases/download/v1.27.7+k3s2/k3s-arm64
[INFO]  Verifying binary download
[INFO]  Installing k3s to /usr/local/bin/k3s
[INFO]  Skipping installation of SELinux RPM
[INFO]  Creating /usr/local/bin/kubectl symlink to k3s
[INFO]  Creating /usr/local/bin/crictl symlink to k3s
[INFO]  Creating /usr/local/bin/ctr symlink to k3s
[INFO]  Creating killall script /usr/local/bin/k3s-killall.sh
[INFO]  Creating uninstall script /usr/local/bin/k3s-uninstall.sh
[INFO]  env: Creating environment file /etc/systemd/system/k3s.service.env
[INFO]  systemd: Creating service file /etc/systemd/system/k3s.service
[INFO]  systemd: Enabling k3s unit
Created symlink /etc/systemd/system/multi-user.target.wants/k3s.service → /etc/systemd/system/k3s.service.
[INFO]  systemd: Starting k3s

ubuntu@k3s:~$ sudo k3s kubectl get nodes
NAME   STATUS   ROLES                  AGE   VERSION
k3s    Ready    control-plane,master   19s   v1.27.7+k3s2

ubuntu@k3s:~$ sudo ss -lntpu | grep k3s-server
tcp   LISTEN 0      4096                          127.0.0.1:10248      0.0.0.0:*    users:(("k3s-server",pid=2786,fd=172))
tcp   LISTEN 0      4096                          127.0.0.1:10249      0.0.0.0:*    users:(("k3s-server",pid=2786,fd=208))
tcp   LISTEN 0      4096                          127.0.0.1:6444       0.0.0.0:*    users:(("k3s-server",pid=2786,fd=15))
tcp   LISTEN 0      4096                          127.0.0.1:10256      0.0.0.0:*    users:(("k3s-server",pid=2786,fd=206))
tcp   LISTEN 0      4096                          127.0.0.1:10257      0.0.0.0:*    users:(("k3s-server",pid=2786,fd=86))
tcp   LISTEN 0      4096                          127.0.0.1:10258      0.0.0.0:*    users:(("k3s-server",pid=2786,fd=202))
tcp   LISTEN 0      4096                          127.0.0.1:10259      0.0.0.0:*    users:(("k3s-server",pid=2786,fd=209))
tcp   LISTEN 0      4096                                  *:10250            *:*    users:(("k3s-server",pid=2786,fd=168))
tcp   LISTEN 0      4096                                  *:6443             *:*    users:(("k3s-server",pid=2786,fd=13))

ubuntu@k3s:~$ sudo cat /var/lib/rancher/k3s/server/node-token
K10fa8d62310e361852c7607ba12b9667cd05f52122df80ca928448200295bb0969::server:c421b343a4f042a2a3511156664a76b1

ubuntu@k3s:~$ exit
logout
➜ multipass launch --name k3s-worker --cpus 1 --memory 1G --disk 10G
Launched: k3s-worker
➜ multipass list
Name                    State             IPv4             Image
k3s                     Running           192.168.64.2     Ubuntu 22.04 LTS
                                          10.42.0.0
                                          10.42.0.1
k3s-worker              Running           192.168.64.3     Ubuntu 22.04 LTS
➜ multipass shell k3s-worker
Welcome to Ubuntu 22.04.3 LTS (GNU/Linux 5.15.0-89-generic aarch64)
ubuntu@k3s-worker:~$ curl -sfL https://get.k3s.io | K3S_URL=https://192.168.64.2:6443 K3S_TOKEN="K10fa8d62310e361852c7607ba12b9667cd05f52122df80ca928448200295bb0969::server:c421b343a4f042a2a3511156664a76b1" sh -
[INFO]  Finding release for channel stable
[INFO]  Using v1.27.7+k3s2 as release
[INFO]  Downloading hash https://github.com/k3s-io/k3s/releases/download/v1.27.7+k3s2/sha256sum-arm64.txt
[INFO]  Downloading binary https://github.com/k3s-io/k3s/releases/download/v1.27.7+k3s2/k3s-arm64
[INFO]  Verifying binary download
[INFO]  Installing k3s to /usr/local/bin/k3s
[INFO]  Skipping installation of SELinux RPM
[INFO]  Creating /usr/local/bin/kubectl symlink to k3s
[INFO]  Creating /usr/local/bin/crictl symlink to k3s
[INFO]  Creating /usr/local/bin/ctr symlink to k3s
[INFO]  Creating killall script /usr/local/bin/k3s-killall.sh
[INFO]  Creating uninstall script /usr/local/bin/k3s-agent-uninstall.sh
[INFO]  env: Creating environment file /etc/systemd/system/k3s-agent.service.env
[INFO]  systemd: Creating service file /etc/systemd/system/k3s-agent.service
[INFO]  systemd: Enabling k3s-agent unit
Created symlink /etc/systemd/system/multi-user.target.wants/k3s-agent.service → /etc/systemd/system/k3s-agent.service.
[INFO]  systemd: Starting k3s-agent

ubuntu@k3s-worker:~$ exit
logout
部署测试 Nginx Service
➜ multipass shell k3s
Welcome to Ubuntu 22.04.3 LTS (GNU/Linux 5.15.0-89-generic aarch64)
ubuntu@k3s:~$ sudo k3s kubectl get nodes
NAME         STATUS   ROLES                  AGE     VERSION
k3s          Ready    control-plane,master   9m26s   v1.27.7+k3s2
k3s-worker   Ready    <none>                 71s     v1.27.7+k3s2
ubuntu@k3s:~$ vim nginx-deploy-svc.yaml
---
apiVersion: apps/v1
kind: Deployment
metadata:
  name: nginx-deploy
spec:
  replicas: 2
  selector:
    matchLabels:
      app: nginx
  template:
    metadata:
      labels:
        app: nginx
    spec:
      containers:
        - name: nginx
          image: nginx
          ports:
            - containerPort: 80
---
apiVersion: v1
kind: Service
metadata:
  name: nginx-svc
spec:
  selector:
    app: nginx
  ports:
    - name: http
      port: 80
  type: NodePort
ubuntu@k3s:~$ sudo k3s kubectl apply -f nginx-deploy-svc.yaml
deployment.apps/nginx-deploy created
service/nginx-svc created
ubuntu@k3s:~$ sudo k3s kubectl get all
NAME READY STATUS RESTARTS AGE
pod/nginx-deploy-55f598f8d-pzr6n 1/1 Running 0 20m
pod/nginx-deploy-55f598f8d-z55ng 1/1 Running 0 20m
NAME TYPE CLUSTER-IP EXTERNAL-IP PORT(S) AGE
service/kubernetes ClusterIP 10.43.0.1 <none> 443/TCP 68m
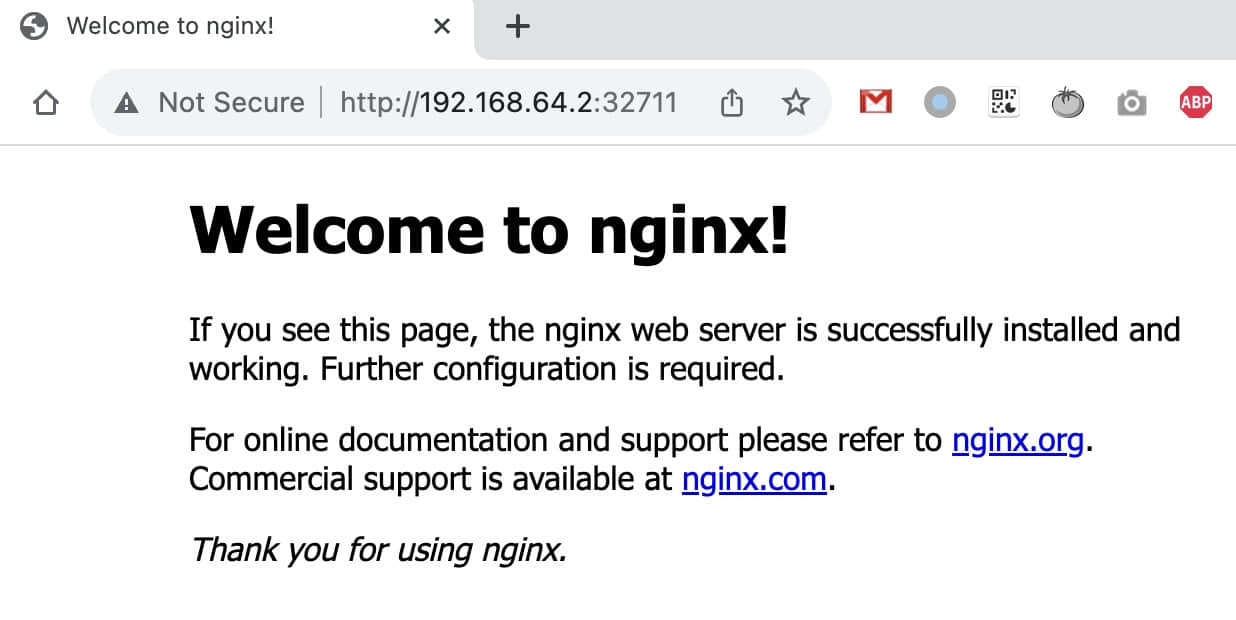
service/nginx-svc NodePort 10.43.202.7 <none> 80:32711/TCP 20m
NAME READY UP-TO-DATE AVAILABLE AGE
deployment.apps/nginx-deploy 2/2 2 2 20m
NAME DESIRED CURRENT READY AGE
replicaset.apps/nginx-deploy-55f598f8d 2 2 2 20m
ubuntu@k3s:~$ exit
logout
➜ multipass list
Name                    State             IPv4             Image
k3s                     Running           192.168.64.2     Ubuntu 22.04 LTS
                                          10.42.0.0
                                          10.42.0.1
k3s-worker              Running           192.168.64.3     Ubuntu 22.04 LTS
                                          10.42.1.0
                                          10.42.1.1
清理 Multipass 和 K3S
➜ multipass delete k3s k3s-worker

➜ multipass list
Name                    State             IPv4             Image
k3s                     Deleted           --               Not Available
k3s-worker              Deleted           --               Not Available

➜ multipass purge

➜ multipass list
No instances found.
➜ brew uninstall --cask multipass
==> Uninstalling Cask multipass
==> Removing launchctl service com.canonical.multipassd
==> Uninstalling packages:
com.canonical.multipass.multipassd
com.canonical.multipass.multipass
com.canonical.multipass.multipass_gui
==> Removing files:
/opt/homebrew/etc/bash_completion.d/multipass
/Applications/Multipass.app
/Library/Application Support/com.canonical.multipass
/Library/Logs/Multipass
/usr/local/bin/multipass
/usr/local/etc/bash_completion.d/multipass
==> Purging files for version 1.12.2 of Cask multipass
K3D 实践
K3D 是一个轻量级的工具,用于在 Docker 中运行 K3S。
基础环境
OS: macOS
Architecture: ARM64
Driver: Docker

Installer: Homebrew
安装使用 K3D
➜ brew install k3d
==> Installing k3d
==> Pouring k3d--5.6.0.arm64_sonoma.bottle.tar.gz
==> k3d
➜ k3d version
k3d version v5.6.0
k3s version v1.27.5-k3s1 (default)
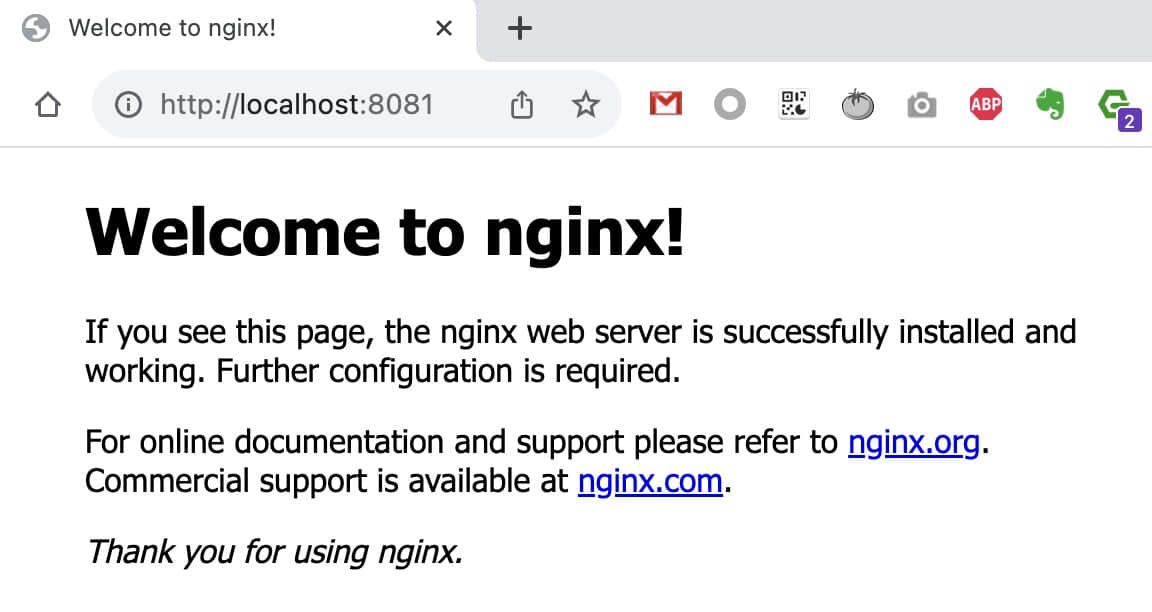
创建一个名为 mycluster 的 K8S 集群,并将 Ingress 的80端口暴露到 localhost 的8081端口。
➜ k3d cluster create mycluster -p "8081:80@loadbalancer" --agents 1
INFO[0000] portmapping '8081:80' targets the loadbalancer: defaulting to [servers:*:proxy agents:*:proxy]
INFO[0000] Prep: Network
INFO[0000] Created network 'k3d-mycluster'
INFO[0000] Created image volume k3d-mycluster-images
INFO[0000] Starting new tools node...
INFO[0000] Starting Node 'k3d-mycluster-tools'
INFO[0001] Creating node 'k3d-mycluster-server-0'
INFO[0001] Creating node 'k3d-mycluster-agent-0'
INFO[0001] Creating LoadBalancer 'k3d-mycluster-serverlb'
INFO[0001] Using the k3d-tools node to gather environment information
INFO[0001] HostIP: using network gateway 192.168.167.1 address
INFO[0001] Starting cluster 'mycluster'
INFO[0001] Starting servers...
INFO[0001] Starting Node 'k3d-mycluster-server-0'
INFO[0004] Starting agents...
INFO[0004] Starting Node 'k3d-mycluster-agent-0'
INFO[0007] Starting helpers...
INFO[0007] Starting Node 'k3d-mycluster-serverlb'
INFO[0013] Injecting records for hostAliases (incl. host.k3d.internal) and for 3 network members into CoreDNS configmap...
INFO[0015] Cluster 'mycluster' created successfully!
INFO[0015] You can now use it like this:
kubectl cluster-info
➜ kubectl cluster-info
Kubernetes control plane is running at https://0.0.0.0:56685
CoreDNS is running at https://0.0.0.0:56685/api/v1/namespaces/kube-system/services/kube-dns:dns/proxy
Metrics-server is running at https://0.0.0.0:56685/api/v1/namespaces/kube-system/services/https:metrics-server:https/proxy
部署测试 Nginx Service
➜ kubectl get all
NAME                 TYPE        CLUSTER-IP   EXTERNAL-IP   PORT(S)   AGE
service/kubernetes   ClusterIP   10.43.0.1    <none>        443/TCP   48s
➜ vim nginx-deploy-svc-ingress.yaml
---
apiVersion: apps/v1
kind: Deployment
metadata:
  name: nginx-deploy
spec:
  replicas: 2
  selector:
    matchLabels:
      app: nginx
  template:
    metadata:
      labels:
        app: nginx
    spec:
      containers:
        - name: nginx
          image: nginx
          ports:
            - containerPort: 80
---
apiVersion: v1
kind: Service
metadata:
  name: nginx-svc
spec:
  selector:
    app: nginx
  ports:
    - name: http
      port: 80
  type: NodePort
---
apiVersion: networking.k8s.io/v1
kind: Ingress
metadata:
  name: nginx-ingress
  annotations:
    ingress.kubernetes.io/ssl-redirect: "false"
spec:
  rules:
    - http:
        paths:
          - path: /
            pathType: Prefix
            backend:
              service:
                name: nginx-svc
                port:
                  number: 80
➜ kubectl apply -f nginx-deploy-svc-ingress.yaml
deployment.apps/nginx-deploy created
service/nginx-svc created
ingress.networking.k8s.io/nginx-ingress created
➜ kubectl get all
NAME                               READY   STATUS    RESTARTS   AGE
pod/nginx-deploy-55f598f8d-z9n5v   1/1     Running   0          2m
pod/nginx-deploy-55f598f8d-h5zkb   1/1     Running   0          2m

NAME                 TYPE        CLUSTER-IP     EXTERNAL-IP   PORT(S)        AGE
service/kubernetes   ClusterIP   10.43.0.1      <none>        443/TCP        3m12s
service/nginx-svc    NodePort    10.43.58.173   <none>        80:32459/TCP   2m

NAME                           READY   UP-TO-DATE   AVAILABLE   AGE
deployment.apps/nginx-deploy   2/2     2            2           2m

NAME                                     DESIRED   CURRENT   READY   AGE
replicaset.apps/nginx-deploy-55f598f8d   2         2         2       2m
➜ kubectl get ingress
NAME            CLASS    HOSTS   ADDRESS                       PORTS   AGE
nginx-ingress   <none>   *       192.168.167.2,192.168.167.3   80      2m56s
通过 Ingress 访问 Nginx: http://localhost:8081
清理 K3D
➜ k3d cluster list
NAME        SERVERS   AGENTS   LOADBALANCER
mycluster   1/1       1/1      true

➜ k3d cluster delete mycluster
INFO[0000] Deleting cluster 'mycluster'
INFO[0000] Deleting cluster network 'k3d-mycluster'
INFO[0000] Deleting 1 attached volumes...
INFO[0000] Removing cluster details from default kubeconfig...
INFO[0000] Removing standalone kubeconfig file (if there is one)...
INFO[0000] Successfully deleted cluster mycluster!

➜ k3d cluster list
NAME   SERVERS   AGENTS   LOADBALANCER